
1. Kompose란?

docker-compose.yml 파일을 쿠버네티스를 실행하기 위한 yaml 파일로 변환하는 툴이다.
Kompose - Convert your Docker Compose file to Kubernetes or OpenShift
Why do cats (and developers) like Kompose? Developers love to simplify their development environment with Docker Compose. With Kompose, you can now push the same file to a production container orchestrator! Getting Started
kompose.io
https://kompose.io/installation/#windows
Kompose - Installation
Installation We have multiple ways to install Kompose. Our preferred (and most up-to-date) method is downloading the binary from the latest GitHub release. GitHub release Kompose is released via GitHub, you can see all current releases on the GitHub releas
kompose.io
일단 Kompose를 깔아보자(Windows 기준)

이거 누르면 .exe 파일이 깔린다.
나는 c:\bin 이라는 폴더를 만들고 해당 파일을 넣어줬다.

파일 명도 길었는데, 간단하게 kompose.exe 로 변경했다.
2. 시스템 환경 변수 편집

kompose.exe 를 어디서든 사용할 수 있게 환경 변수, Path 에 추가해줬다.
터미널에서 kompose version을 입력하면
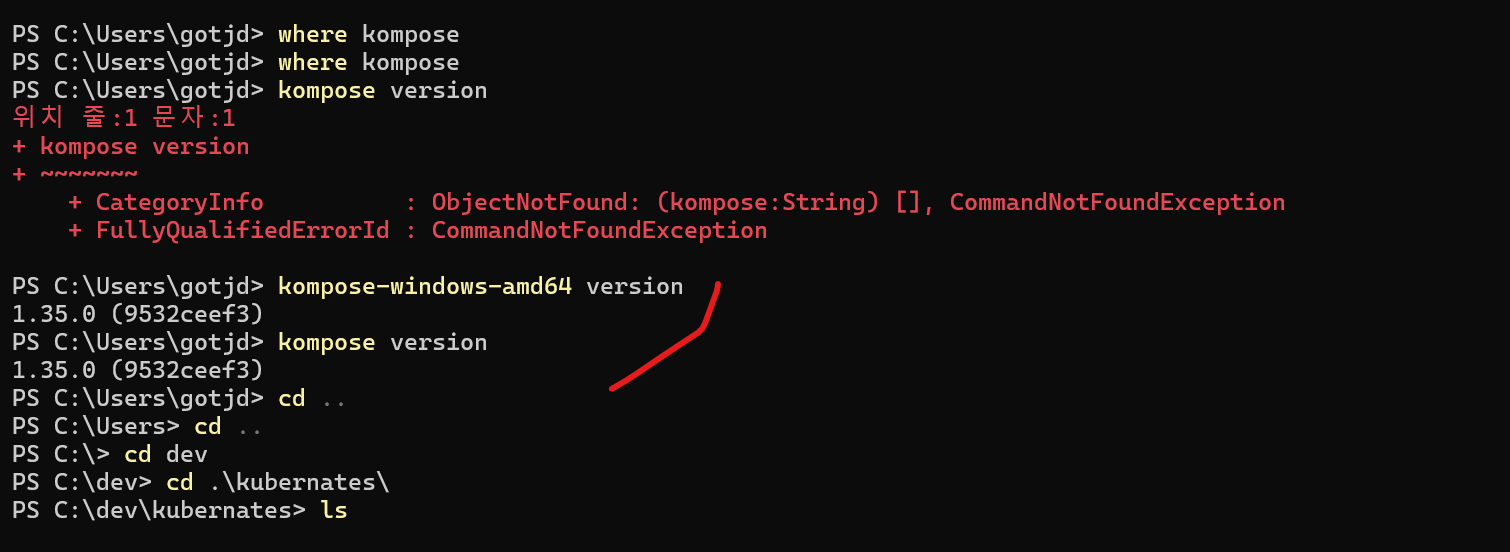
기존 이름이 kompose-windows-amd64.exe 였다.
너무 길어서 간단하게 kompose.exe 로 변경
버전이 1.35.0 인 것을 확인할 수 있다.
3. docker-compose.yml 을 변환하기
일단 docker-compose.yml 이 있는 폴더로 이동한다.

kompose convert
Kubernates file 들이 깔린 모습을 확인할 수 있다.
4. todo-web-application-deployment.yaml
apiVersion: apps/v1
kind: Deployment
metadata:
  labels:
    io.kompose.service: todo-web-application
  name: todo-web-application
spec:
  replicas: 1
  selector:
    matchLabels:
      io.kompose.service: todo-web-application
  template:
    metadata:
      labels:
        io.kompose.service: todo-web-application
    spec:
      containers:
        - env:
            - name: RDS_DB_NAME
              value: todos
            - name: RDS_HOSTNAME
              value: postgres
            - name: RDS_PASSWORD
              value: password
            - name: RDS_PORT
              value: "5432"
            - name: RDS_USERNAME
              value: postgres
          image: griotold/todo-app:3.0
          name: todo-web-application
          ports:
            - containerPort: 8080
              protocol: TCP
restartPolicy: Always쿠버네티스에서 동작하기 위한 설정 파일의 모습이다.
docker-compose.yml 의 내용을 그대로 가져온 것이다.
metadata가 조금 있었는데 불필요한 내용은 가지쳐줬다.
5. todo-web-application-service.yaml
apiVersion: v1
kind: Service
metadata:
  labels:
    io.kompose.service: todo-web-application
  name: todo-web-application
spec:
  type: LoadBalancer
  ports:
    - name: "8080"
      port: 8080
      targetPort: 8080
  selector:
io.kompose.service: todo-web-applicationspec.type: LoadBalancer 는 추가해준 것이다.
6. postgres-deployment.yaml
apiVersion: apps/v1
kind: Deployment
metadata:
  labels:
    io.kompose.service: postgres
  name: postgres
spec:
  replicas: 1
  selector:
    matchLabels:
      io.kompose.service: postgres
  strategy:
    type: Recreate
  template:
    metadata:
      labels:
        io.kompose.service: postgres
    spec:
      containers:
        - env:
            - name: POSTGRES_DB
              value: todos
            - name: POSTGRES_PASSWORD
              value: password
            - name: POSTGRES_USER
              value: postgres
          image: postgres
          name: postgres
          ports:
            - containerPort: 5432
              protocol: TCP
          volumeMounts:
            - mountPath: /var/lib/postgresql/data
              name: postgres-data
      restartPolicy: Always
      volumes:
        - name: postgres-data
          persistentVolumeClaim:
            claimName: postgres-data
7. postgres-data-persistentvolumeclaim.yaml
apiVersion: v1
kind: PersistentVolumeClaim
metadata:
  labels:
    io.kompose.service: postgres-data
  name: postgres-data
spec:
  accessModes:
    - ReadWriteOnce
  resources:
    requests:
      storage: 100Mi
8. postgres-service.yaml
apiVersion: v1
kind: Service
metadata:
  labels:
    io.kompose.service: postgres
  name: postgres
spec:
  type: LoadBalancer
  ports:
    - name: "5432"
      port: 5432
      targetPort: 5432
  selector:
io.kompose.service: postgresspec.type: LoadBalancer 는 추가해준 것이다.
9.kubectl apply
kubectl apply -f postgres-data-persistentvolumeclaim.yaml,postgres-deployment.yaml,postgres-service.yaml
postgres 관련 yaml 파일을 적용시켜준다.

비용을 절감하기 위해 구글 클라우드에 nodes=0 으로 지정해놨는데,
쿠버네티스를 돌리기 위해 nodes=3으로 바꿔줬다.
kubectl apply -f todo-web-application-deployment.yaml,todo-web-application-service.yaml
이번에는 spring web 관련 설정 파일을 적용시켜준다.

kubectl get all
명령어로 확인해보니
todo-app 의 외부 IP 가 보인다.
해당 주소로 요청을 보내보자.

'인프라 > docker' 카테고리의 다른 글
| docker로 Spring Boot App, Postgres 이미지 만들어서 실행시키기 (0) | 2025.01.10 |
|---|---|
| 2024 12 4 TIL - Docker Compose (1) | 2024.12.04 |
| 2024 12 3 - Docker로 Spring Boot Application 실행하기(Feat. Dockerfile) (0) | 2024.12.03 |
| 2024 12 2 TIL - Docker (2) | 2024.12.02 |